How to Make Your BMX Bike More Comfortable in Minutes
You don’t need new parts or a mechanic to fix an uncomfortable BMX bike — you need about ten minutes and the right adjustments. Most riders suffer through discomfort assuming it requires expensive upgrades, when the real fix is usually free or nearly free. The fastest BMX bike comfort upgrades involve adjusting what you already have: seat height, seat angle, grip position, and tire pressure. These tweaks cost nothing and take minutes, yet they often resolve the discomfort that sends riders shopping for new components. When adjustments aren’t enough, a few cheap additions like BMX seat padding, better grips, or padded shorts complete the comfort transformation. This guide covers the quickest, cheapest ways to make your BMX dramatically more comfortable — starting right now with tools you probably already own.
BMX bikes are stripped-down machines built for tricks and sprints, not comfort — but that doesn’t mean you have to accept discomfort. The same minimal design that makes them great for the skatepark can be tuned for far more comfortable riding with simple adjustments and a few inexpensive additions. Whether your hands go numb, your sit bones ache, or the ride feels harsh, there’s a quick fix. Here are the fastest BMX bike comfort upgrades that take minutes and cost little to nothing, ranked from free adjustments to cheap additions.
What’s the Fastest Way to Make a BMX Bike More Comfortable?
The fastest comfort improvement is adjusting your seat height and angle — a free, two-minute change that resolves the majority of BMX comfort complaints by properly distributing your weight and engaging your legs in support.
Quick wins ranked by speed and impact:
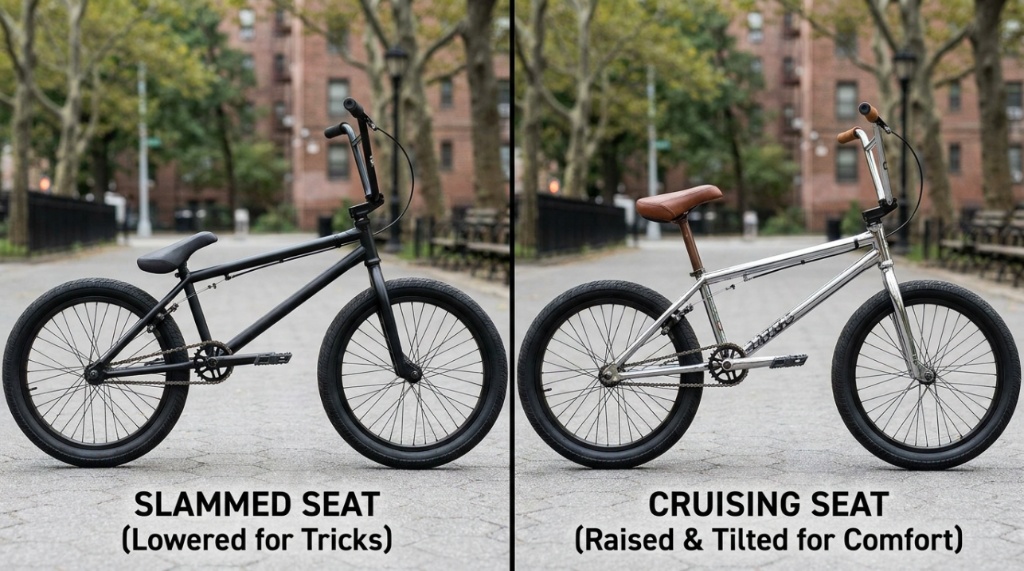
- Adjust seat height (2 minutes, free): Raising a too-low seat to proper pedaling height engages your legs, reducing saddle pressure dramatically.
- Adjust seat angle (2 minutes, free): Leveling or slightly tilting the seat relieves pressure points.
- Set proper tire pressure (3 minutes, free): Lowering pressure slightly adds cushioning and absorbs bumps.
- Reposition grips/bars (5 minutes, free): Adjusting bar angle improves hand and wrist comfort.
- Add padded grips ($10–$20): Cushioned grips reduce hand numbness and vibration.
- Add seat padding or padded shorts ($15–$40): Extra cushioning for sit-bone comfort.
How Does Seat Height Adjustment Improve Comfort?
Raising a too-low BMX seat to proper pedaling height engages your leg muscles in supporting your body weight, reducing the pressure dumped onto the saddle and eliminating much sit-bone discomfort — all in two minutes with one tool.
How to adjust seat height for comfort:
- Loosen the seat clamp: Use the appropriate Allen key or quick-release.
- Set the height: For comfortable riding, position the seat so your leg is nearly straight (slight bend at the knee) when the pedal is at its lowest point. This is much higher than typical trick-riding height.
- Tighten securely: Ensure the clamp is firmly tightened so the seat doesn’t slip.
- Test and fine-tune: Ride briefly and adjust. Too high causes rocking; too low cramps pedaling.
Why it works: BMX riders often run seats very low for trick clearance, which forces your sit bones to bear most of your weight. At proper pedaling height, your legs actively support your body through the pedal stroke, sharing the load and relieving the saddle. This single adjustment is the most impactful free comfort fix for most riders.
How Does Tire Pressure Affect BMX Comfort?
Lowering tire pressure slightly (within the safe range) adds cushioning that absorbs bumps and vibration, making the ride noticeably smoother — a free three-minute adjustment that reduces the harshness of rigid BMX frames.
Tire pressure for comfort:
| Pressure Level | Feel | Best For |
|---|---|---|
| Max pressure (high) | Fast, harsh, hard | Smooth skateparks, racing |
| Mid-range pressure | Balanced comfort/speed | Mixed riding, general comfort |
| Lower pressure (within safe range) | Cushioned, grippy, smoother | Rough surfaces, comfort priority |
How to adjust:
- Check the tire sidewall for the safe pressure range (e.g., 40–65 PSI)
- For more comfort, run toward the lower end of the safe range
- Don’t go below the minimum — too-low pressure risks pinch flats and rim damage
- Use a gauge for accuracy; adjust in small increments and test
Lower pressure trades a small amount of speed and pedaling efficiency for noticeably more cushioning. For comfort-focused riding on rough surfaces, this free adjustment makes the rigid BMX ride significantly smoother.
How Do You Fix Hand Numbness and Wrist Pain on a BMX?
Fix hand numbness by adjusting your handlebar and grip angle, adding cushioned grips, and ensuring your weight isn’t excessively forward — addressing the pressure and vibration that cause hand and wrist discomfort.
Hand comfort fixes:
- Adjust bar rotation (free): Rotate the handlebars slightly forward or back to find a wrist-neutral position. Small changes relieve wrist strain.
- Add cushioned grips ($10–$20): Thicker, padded grips absorb vibration and reduce pressure on your palms. One of the cheapest effective comfort upgrades.
- Check weight distribution: If too much weight rests on your hands, raise the seat angle slightly or adjust position to shift weight back.
- Wear padded gloves ($15–$30): Cycling gloves with palm padding reduce vibration and prevent numbness on longer rides.
- Relax your grip: Death-gripping the bars increases fatigue and numbness. A relaxed grip improves comfort and control.
Hand numbness usually stems from a combination of vibration, pressure, and grip tension. Addressing all three — better grips, proper bar angle, relaxed grip, and possibly gloves — eliminates most hand discomfort quickly and cheaply.
What Cheap Additions Improve BMX Comfort the Most?
The most cost-effective comfort additions are cushioned grips ($10–$20), padded cycling shorts ($25–$50), and a better-padded seat ($20–$40) — each addressing a specific discomfort point for under $50.
Best budget comfort additions:
- Cushioned grips ($10–$20): Reduce hand numbness and vibration. Quick to install, immediately noticeable improvement.
- Padded cycling shorts ($25–$50): Add chamois cushioning between you and the seat. The most effective sit-bone comfort upgrade for the money.
- Better-padded seat ($20–$40): A wider, more cushioned seat replaces a minimal trick seat for comfort-focused riding.
- Ergonomic grips ($15–$25): Shaped grips that support your palm reduce wrist and hand strain.
- Gel seat cover ($10–$20): Slips over your existing seat for instant added cushioning without replacing the seat.
For under $50 total, you can address the three main BMX discomfort points: hands (grips), sit bones (shorts or seat), and overall harshness (tire pressure, free). Start with the cheapest fixes and add more only if needed.
Making these quick adjustments will instantly take the strain off your wrists and back, giving you much better control during tight transitions. Once your setup feels dialed in, matching that physical comfort with the right riding habits is your next step. If you ever switch between different styles of riding, knowing how to ride a mountain bike safely can help you apply these same balance and control techniques across any terrain.
Can You Improve BMX Comfort Without Spending Any Money?
Yes — seat height, seat angle, handlebar rotation, tire pressure, and grip tension are all free adjustments that significantly improve comfort. Many riders solve their discomfort entirely without spending a cent.
The free comfort checklist:
- Raise seat to proper pedaling height: Engages legs, reduces saddle pressure. Biggest free improvement.
- Level the seat angle: Or adjust slightly to relieve pressure points.
- Lower tire pressure (within safe range): Adds cushioning, smooths the ride.
- Rotate handlebars to neutral wrist position: Relieves wrist and hand strain.
- Relax your grip and posture: Tension causes fatigue and numbness; relaxation improves comfort.
- Position weight properly: Distribute weight between seat, pedals, and bars rather than dumping it on one point.
Work through these free adjustments first before buying anything. They take about 15 minutes total and resolve a surprising amount of discomfort. Only after exhausting free adjustments should you consider cheap additions for remaining comfort issues.
What’s the Right Order to Make These Comfort Changes?
Start with free adjustments (seat height, angle, tire pressure, bar position), test thoroughly, then add cheap upgrades (grips, padded shorts, seat) only for discomfort that adjustments didn’t resolve — this saves money and identifies the real problem.
Step-by-step comfort improvement order:
- Step 1 — Seat height: Raise to proper pedaling height. Test ride. This alone often solves sit-bone discomfort.
- Step 2 — Seat angle: Level or fine-tune. Test ride.
- Step 3 — Tire pressure: Lower within safe range for cushioning. Test ride.
- Step 4 — Handlebar position: Rotate for wrist comfort. Test ride.
- Step 5 — Assess remaining issues: What still hurts after free adjustments?
- Step 6 — Targeted additions: Add grips (hand issues), padded shorts/seat (sit-bone issues), or gloves (vibration) for specific remaining discomfort.
This order prevents wasting money. Many riders discover that free adjustments solve everything, while others identify exactly which cheap addition addresses their specific remaining issue — rather than buying everything blindly.
How Do You Know If You Need a New Seat or Just Adjustments?
Try all free adjustments first. If discomfort persists after proper seat height, angle, and tire pressure changes plus padded shorts, then the seat itself is likely wrong for your body — too narrow, wrong padding density, or poor shape.
Signs you need a new seat (not just adjustments):
- Sit-bone pressure persists despite proper seat height and padded shorts
- The seat is too narrow to support your sit bones (they hang off the edges)
- Padding has compressed or worn out (old seat)
- Padding density doesn’t match your weight (too soft and bottoming out, or too hard)
- The seat shape creates pressure points no adjustment resolves
Signs adjustments will fix it (no new seat needed):
- Discomfort improves noticeably when you change seat height or angle
- The seat is reasonably padded and appropriately sized
- Pain is related to position rather than the seat surface itself
- Padded shorts significantly help
Exhaust free adjustments and a $30 pair of padded shorts before spending on a new seat. Often the seat is fine and the setup was the problem.
Conclusion
Making your BMX bike more comfortable doesn’t require expensive upgrades or a mechanic — it requires about fifteen minutes of free adjustments and, if needed, a few cheap additions. Start by raising your seat to proper pedaling height (the single most impactful free fix), leveling the seat angle, lowering tire pressure for cushioning, and rotating your handlebars to a wrist-neutral position. These free changes resolve the majority of BMX comfort complaints.
If discomfort remains after free adjustments, target the specific problem cheaply: cushioned grips for hand numbness, padded shorts for sit-bone pressure, or a better-padded seat if yours is genuinely wrong for your body. Work through the changes in order, test after each, and you’ll achieve dramatically better comfort for little to no money. Your stripped-down BMX can be far more comfortable than its minimal design suggests — you just need the right quick adjustments.
What specifically hurts when you ride — hands, sit bones, or overall harshness? Share in the comments — I’ll give you the exact quick fix for your specific discomfort.
Frequently Asked Questions
How can I make my BMX bike more comfortable quickly?
The fastest fixes are free adjustments: raise your seat to proper pedaling height (biggest improvement), level the seat angle, lower tire pressure slightly for cushioning, and rotate handlebars to a wrist-neutral position. These take about 15 minutes total and resolve most BMX comfort complaints without spending money.
Why does my BMX seat feel so uncomfortable?
Usually because the seat is set too low (concentrating weight on your sit bones), at a wrong angle, or because the minimal trick-focused padding can’t handle sustained sitting. Try raising the seat to proper pedaling height and leveling the angle first — these free adjustments often solve the problem.
What’s the cheapest way to add BMX comfort?
Free adjustments (seat height, angle, tire pressure) cost nothing and help most. For cheap additions, cushioned grips ($10–$20) fix hand numbness, and padded cycling shorts ($25–$50) are the most effective sit-bone comfort upgrade. Start with free fixes, then add only what’s needed for remaining issues.
Will lowering my tire pressure make my BMX more comfortable?
Yes — running tire pressure toward the lower end of the safe range (check the sidewall) adds cushioning that absorbs bumps and vibration, smoothing the ride. Don’t go below the minimum pressure, as that risks pinch flats and rim damage. It’s a free three-minute comfort improvement.
How do I stop my hands from going numb on my BMX?
Add cushioned grips ($10–$20), rotate your handlebars to a wrist-neutral angle, relax your grip (don’t death-grip the bars), and consider padded cycling gloves. Hand numbness comes from vibration, pressure, and grip tension — addressing all three eliminates most numbness quickly and cheaply.
Do I need padded shorts for BMX riding?
For short trick sessions, no. For longer rides or commuting, padded cycling shorts ($25–$50) dramatically improve comfort by adding chamois cushioning between your sit bones and the seat. They’re the most cost-effective sit-bone comfort upgrade and complement any seat.
Should I adjust my bike or buy a new seat for comfort?
Always try free adjustments first — seat height, angle, and tire pressure. Add padded shorts if needed. Only buy a new seat if discomfort persists after these changes, which indicates the seat is genuinely wrong for your body (too narrow, wrong padding density, or worn out). Adjustments solve most issues for free.